


How to Rip DVDs with HandBrake to MP4 for Free in 2026
HandBrake is one of the best free tools to rip DVDs to MP4, MKV, and other more portable formats on Windows, Mac, and Linux. In this 2026 updated guide, we walk through the detailed steps to rip DVDs with HandBrake on Windows and Mac, share the practical settings for better output, cover the common DVD ripping issues and fixes, and introduce two free HandBrake alternatives if HandBrake cannot read or convert your DVD properly.
Video Tutorial: How to Rip a DVD to MP4 with HandBrake
- • Part 1: Can HandBrake Rip DVDs?
- • Part 2: How to Rip DVDs with HandBrake on Windows
- • Part 3: How to Rip DVDs with HandBrake on Mac
- • Part 4: What Are the Best Settings for DVD Ripping in HandBrake?
- • Part 5: Why HandBrake Won't Rip Some DVDs and How to Fix It
- • Part 6: Two Free Alternatives to HandBrake for Ripping DVDs
- • Part 7: FAQs About Ripping DVDs with HandBrake
Part 1: Can HandBrake Rip DVDs?
Before getting started, let's clarify what HandBrake can and cannot do when ripping DVDs. HandBrake can convert unprotected DVDs, DVD folders, and ISO images to MP4, MKV, and WebM for free, with presets and video encoders such as H.264, H.265/HEVC, AV1, MPEG, and VP9.
Disclaimer: This guide is intended for home-made, personal, unprotected DVDs, or DVDs you have the right to rip or convert. We do not recommend bypassing copy protection on commercial DVDs or Blu-ray discs. Always follow your local copyright laws.
Part 2: How to Rip DVDs with HandBrake on Windows
Let's walk through how to rip DVDs to MP4 with HandBrake on Windows 11.
Step 1: Download and Install HandBrake for Windows
Go to the HandBrake official site and download the latest Windows version (V1.11.1). Double-click the installer and follow the on-screen instructions to install HandBrake.
Step 2: Add the DVD Source
Insert a DVD into your computer's built-in or external DVD drive. Here we are using the external one.
Launch HandBrake. In the Open Source window, select your DVD drive. If it does not appear automatically, click 'Open Source' on the toolbar and choose the DVD drive manually.
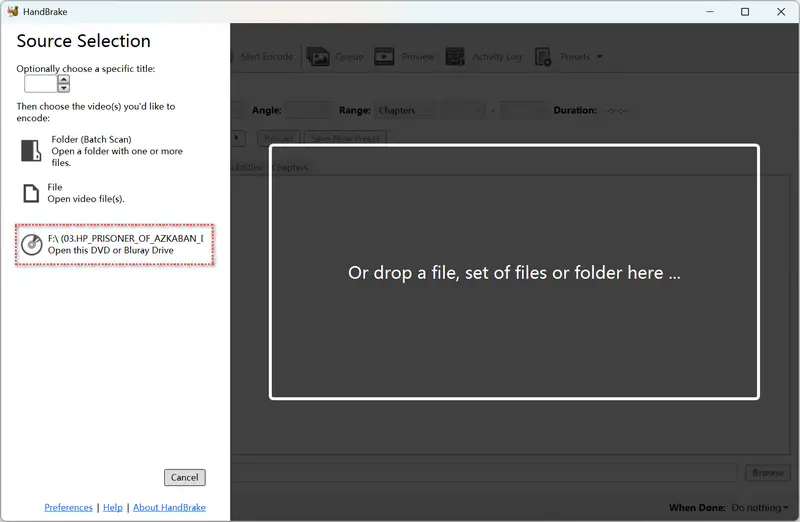
Select this recognized DVD drive, then HandBrake will scan the disc and load available titles. This may take a few seconds to several minutes, depending on your DVD drive, disc condition, and the number of titles.

Step 3: Select DVD Title and Chapter
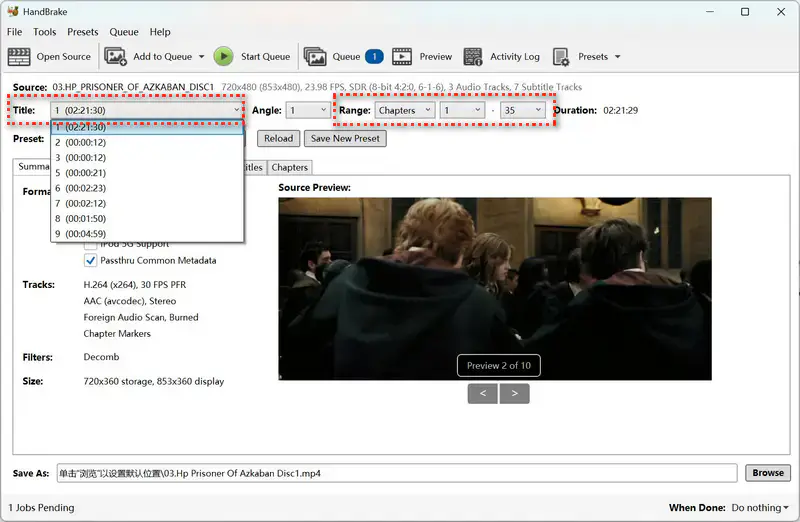
After the scan is complete, HandBrake lists the available DVD titles in the Title dropdown. Select the particular one you want to convert.
For a movie DVD, the main feature is usually the longest title and may be the first one, and is selected by default. For TV series DVDs with multiple similar titles, check the title duration and preview before ripping.
You can also choose to convert a specific range by Chapters, Seconds, or Frames.
Step 4: Select an Output Preset or Customize the Output Settings
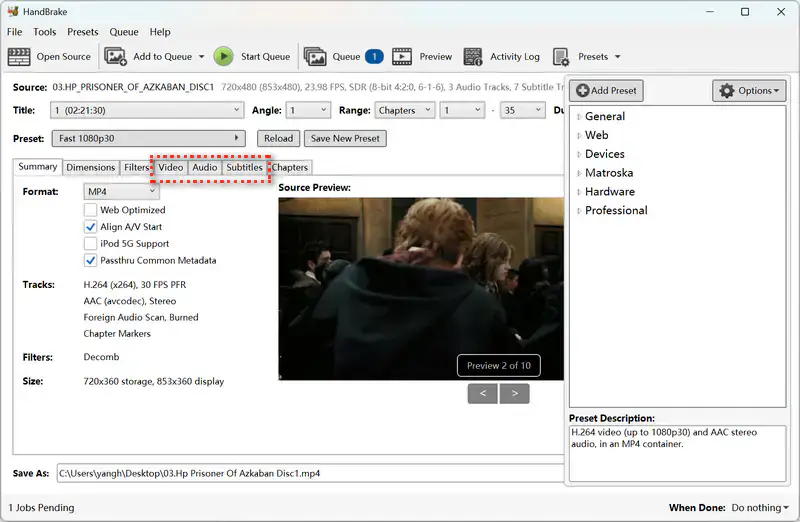
HandBrake provides built-in presets for general use, web videos, devices, Matroska/MKV, hardware encoders, and professional workflows. Open the 'Preset' dropdown and choose one that matches your target device or quality needs.
For DVD sources, a 480p preset is usually suitable for NTSC DVDs, while a 576p preset is suitable for PAL DVDs. If you want better quality, choose an HQ or Super HQ preset. If you prefer faster encoding and smaller files, choose Fast or Very Fast.
You can also adjust the video settings, such as codec, quality, and frame rate, and select the audio tracks and subtitles you want to preserve.
Step 5: Specify the Output Destination and Start DVD Ripping
In the Destination section, enter a file name in 'Save As' and click 'Browse' to choose where you want to save the converted DVD video.
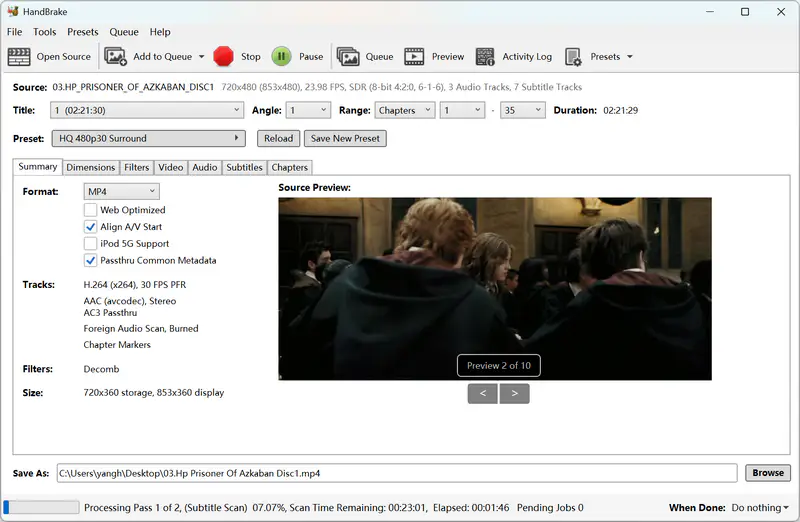
After confirming all settings, click 'Start Encode' on the top toolbar to start ripping the DVD with HandBrake.
HandBrake is powerful, but it may feel technical for beginners because you need to manually choose the DVD title, preset, container format, video codec, audio tracks, subtitles, and output settings. If you prefer fewer manual steps, Any Video Converter offers a free DVD ripping tool that can scan DVD titles, skip unnecessary clips, keep selected subtitles/audio tracks, and convert DVDs to MP4, MKV, MOV, AVI, and other popular formats.

Part 3: How to Rip DVDs with HandBrake on Mac
HandBrake works similarly on Windows and Mac, but the layout and a few steps are slightly different. Here is a separate guide on how to rip DVDs with HandBrake on Mac.
Step 1: Download HandBrake for Mac
Download the latest version of HandBrake for Mac from the official website. The current version is 1.11.1 for macOS 10.13 or later. Install the app and open HandBrake from the Applications folder.
Step 2: Open the DVD Source
Plug an external DVD drive into your Mac via the USB cable and insert a Disc. If the disc is recognized by Mac, the application DVD player will automatically play the DVD, and you can close it to continue.
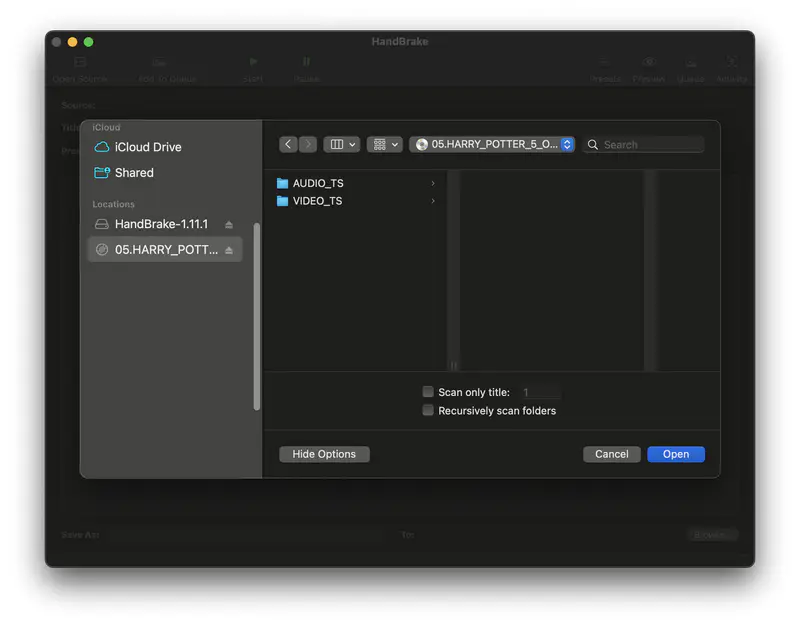
Open HandBrake and click 'Open Source'. Select your DVD drive from the sidebar under Locations, then click 'Open'.
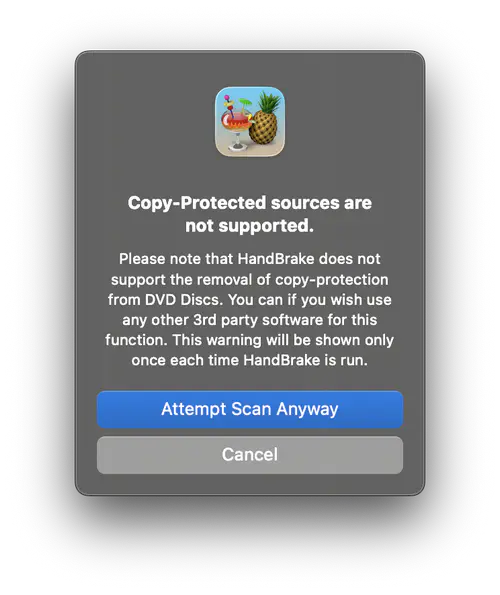
You may get a prompt that says 'Copy-protected sources are not supported', even if your disc is not copy-protected, so click 'Attempt Scan Anyway' to start scanning the disk title by title.
Step 3: Select DVD Title and Chapter
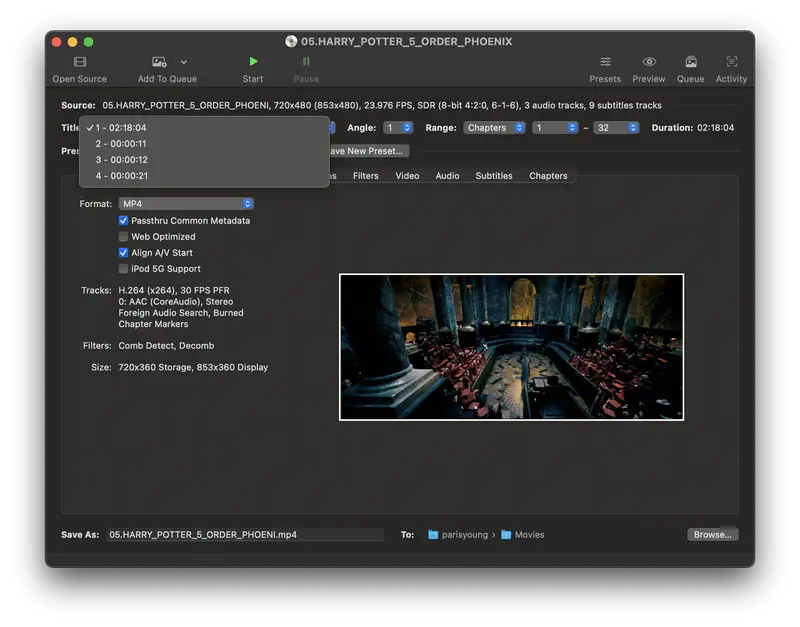
After scanning, all available titles will be listed under the 'Title' option, and you can choose one you want to convert.
Same as the Windows version, the main title (the longest one) is selected by default.
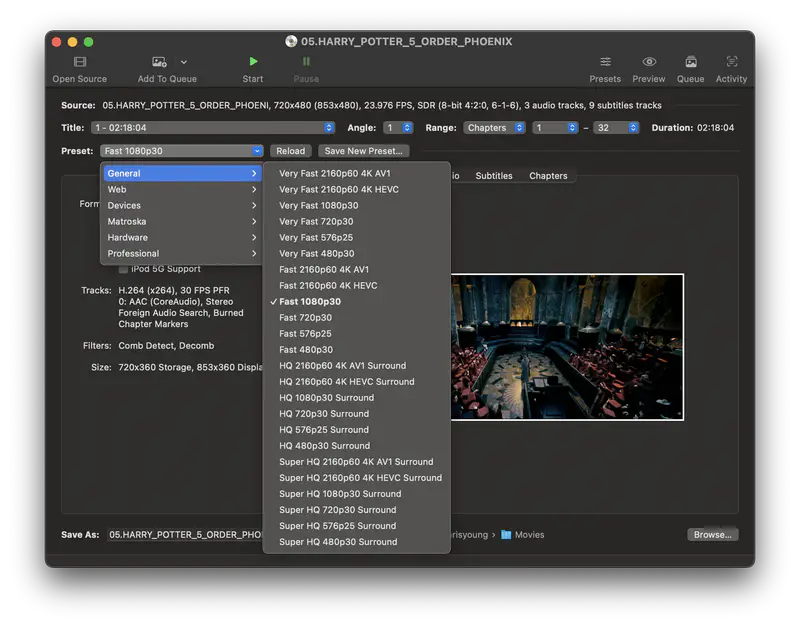
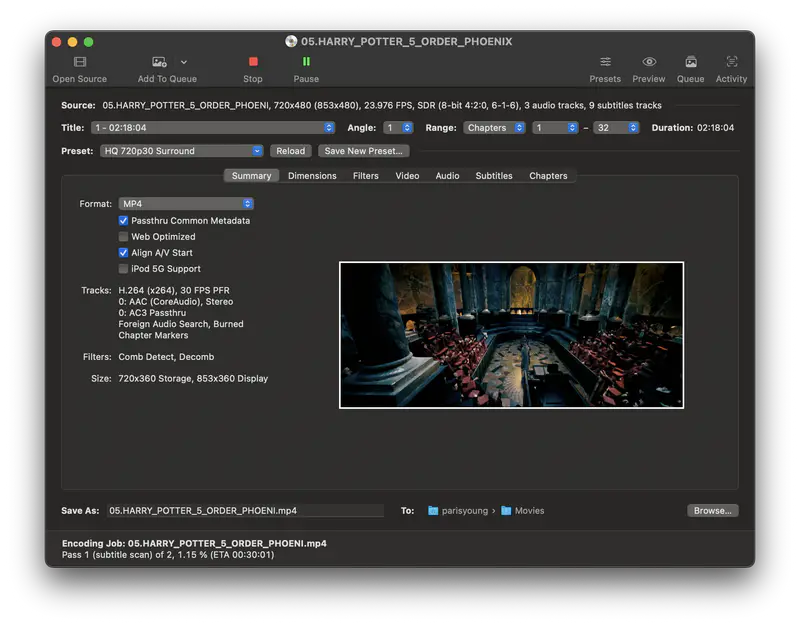
Step 4: Select an Output Preset or Customize the Output Settings
Choose a preset that best matches your needs, and customize the output settings, including video (codec, quality, and fps), audio (audio track and quality), subtitles, filters, and chapters.
Step 5: Set the Output Directory and Start Ripping DVD
At the bottom of HandBrake main interface, enter a file name in 'Save As'. Next to 'To', click 'Browse' to choose the folder where you want to save the converted DVD.
Finally, click 'Start' to begin ripping the DVD with HandBrake. The process may take some time, depending on the title length, DVD condition, selected preset, and your Mac's hardware.
Part 4: What Are the Best Settings for DVD Ripping in HandBrake?
Not sure which HandBrake settings are best to use for DVD ripping? This section covers the recommended the DVD ripping settings, including format, video codec, frame rate, resolution, RF value, subtitles, and audio tracks.
4.1 Video Format: MP4 or MKV?
If you want the best compatibility across different players and devices, choose 'MP4' as the container format.
If you want multiple audio tracks and subtitles to be preserved, choose 'MKV' as the output format.
4.2 Video Codec: H.264, H.265, or AV1?
For most DVD ripping tasks, H.264 is the safest choice currently, as it offers good quality, acceptable file size, fast encoding, and the broadest compatibility with older and newer devices, media players, TVs, and mobile phones.
If you want a smaller file size and your devices support HEVC, H.265 is also a good option. It usually provides better compression than H.264, but it is less universally supported, especially on older devices and some browsers.
If your computer or devices have the latest hardware that fully supports AV1 decoding, AV1 is highly recommended, as it ensures the best quality and most efficient compression. However, AV1 encoding can be slower, and playback compatibility is still not as broad as H.264. For current DVD ripping, AV1 is not the safest option.
4.3 Video Quality: Best Settings to Keep Good Quality
Resolution: To maintain the best quality without blurring, distortion, or pixelation after DVD ripping, the safest option is to use the same resolution as the source. Upscaling a DVD to 720p or 1080p in HandBrake will not add real detail and may only make the file larger or softer. If you want to improve the perceived sharpness or restore details, you can use an AI video enhancer after ripping.
RF (Constant Quality): For H.264 or H.265, RF 18-22 is a good range for 480p/576p DVD sources. Lower RF values produce higher visual quality but larger files, while higher RF values reduce file size with visible quality loss. For most DVD ripping tasks, RF 20-22 is a practical balance. Use RF 18-20 only when you want the original close quality and do not mind a larger size. If you use AV1, choose a higher RF range because AV1 uses a different scale.
FFS: Keep the same as the source in most cases. This helps preserve the original motion without unnecessary frame duplication or conversion.
Filters: In most cases, leave filters off if the DVD looks clean and crisp. Use Decomb for occasional combing or mixed sources. Use Deinterlace only when the whole DVD is clearly interlaced.
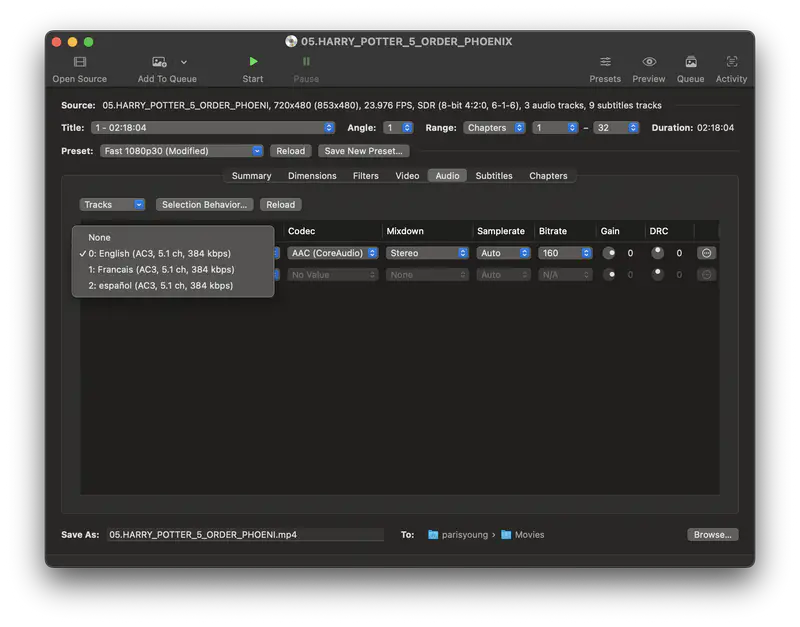
4.4 Audio Settings
For most DVD to MP4 conversions, choose AAC to ensure the best compatibility. If the DVD has multiple audio tracks, keep the language tracks you want and remove the others.
If you want to keep the original DVD audio quality, choose Passthru for supported formats such as AC3 or DTS. However, this may increase the file size, and compatibility depends on the audio format, container, and playback device.
For Sample Rate, choose 'Auto' or the value same as the source.
For Mixdown, choose Stereo for general playback, or 5.1 Surround if you want to keep surround sound, and your device supports it.
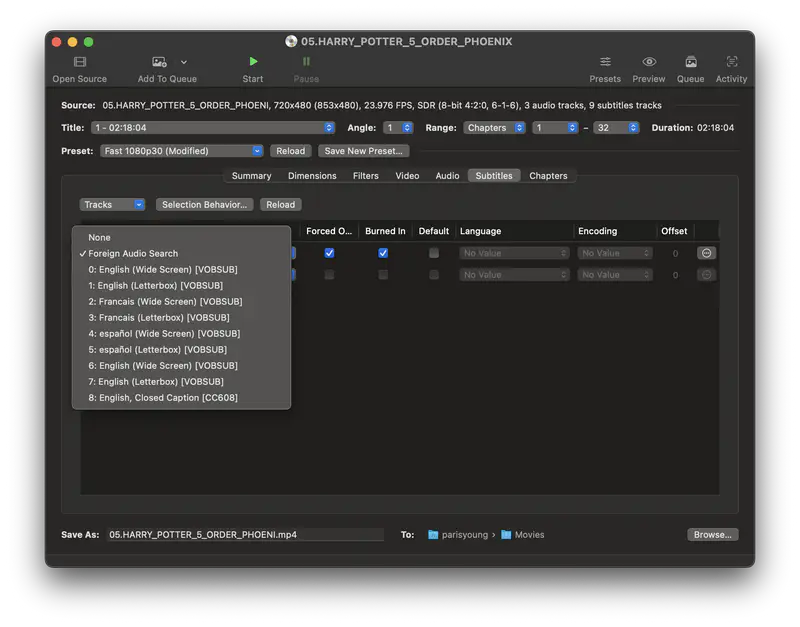
4.5 Subtitles: Soft Subtitles vs. Burned-in Subtitles
Choose soft subtitles if you want to keep subtitles as a separate selectable track. They can usually be turned on or off, changed, or removed later, depending on the player and output container.
Choose burned-in subtitles if you want the subtitles to always appear on the video. Burned-in subtitles are permanently embedded into the video image and cannot be turned off or edited after encoding.
Part 5: Why HandBrake Won't Rip Some DVDs and How to Fix It
When ripping DVDs with HandBrake, you may run into issues such as scan failures, missing or wrong subtitles. Here are some common issues you may encounter when ripping DVDs with HandBrake and how to fix them.
5.1 HandBrake Won't Scan the DVD
If HandBrake fails to scan the DVD, this usually happens when scanning the copy-protected or commercial DVDs.
For copy-protected DVDs successfully, you need to install the libdvdcss libraries to rip DVDs encrypted with CSS.
For commercial DVD or BD, you will need to use the dedicated DVD ripper that can remove the more advanced and complex encryption.
5.2 No Valid Source Found
First of all, make sure you are using the latest version of HandBrake. If the error persists, check whether the problem comes from the disc, the DVD drive, the source structure, or copy protection.
Case 1: If your DVD is unprotected
Check whether the DVD drive is recognized by your computer. If the DVD is scratched, damaged, dirty, or the drive itself is not working properly, HandBrake will fail to read the source.
If the DVD can be recognized by your computer, try playing it with VLC or another media player. If it plays correctly, go back to HandBrake and select the DVD drive again.
If you already have a valid DVD folder or ISO backup, try loading the VIDEO_TS folder or ISO image instead of the physical disc. This can help avoid issues caused by an unstable DVD drive or disc-reading errors.
Case 2: If your DVD is protected
HandBrake does not support built-in copy-protection and DRM removal. Some users use third-party libraries for certain CSS-protected DVDs, but this may not work for all discs and may be restricted by copyright laws in some regions.
One of the practical ways is to use MakeMKV to create an MKV copy from the disc, then import the MKV file into HandBrake for further conversion to MP4.
5.3 HandBrake only rips part of the DVD or the wrong title
DVDs often contain multiple titles, chapters, trailers, bonus clips, or TV episodes. If HandBrake converts only part of the DVD or outputs the wrong title, first open the Title dropdown and check the title duration. For a movie DVD, the main feature is usually the longest title. For a TV show DVD, each episode may be listed as a separate title.
You can also check the chapter range. If you accidentally selected only a few chapters instead of the full title, HandBrake will only convert that selected part.
If the title and chapter range are correct but the issue still happens, the DVD may have fake titles, unusual title structures, region restrictions, copy protection, or disc-reading errors that HandBrake cannot handle properly.
Part 6: 2 Free Alternatives to HandBrake for Ripping DVDs
If the troubleshooting tips above do not solve your problem, or if you still run into issues such as missing subtitles, no audio, scan errors, or incomplete conversions, try a different DVD ripping tool. Below are two free HandBrake alternatives that can help you rip, convert, or extract DVDs when HandBrake does not work.
6.1 Any Video Converter — Best for Beginners Who Want to Convert DVD to MP4
DVD ripping used to be one of the core features of Any Video Converter, and it has now returned in V9.2.0. Compared with HandBrake, it offers a more beginner-friendly workflow, easier output presets, and simpler control over video, audio, and subtitle settings.
Availability: Windows 11, 10 (64-bit); macOS 12 and above
| Pros: | Cons: |
|
🔴 Free does not mean compromised — it remains fully featured and powerful enough to rival many paid DVD rippers. 🔴 Convert DVDs to MP4, MKV, MOV, AVI, and more. 🔴 Preserve one or multiple subtitle and audio tracks. 🔴 Skip unnecessary titles such as intros, trailers, and more. 🔴 More editing tools to help you compress, trim, merge, and enhance quality with AI. |
⚫ Audio passthrough is not currently supported. |
Video Tutorial: How to Rip and Convert DVD to MP4 for Free [2026 Tutorial]
How to Rip DVDs to MP4 for Free with Any Video Converter
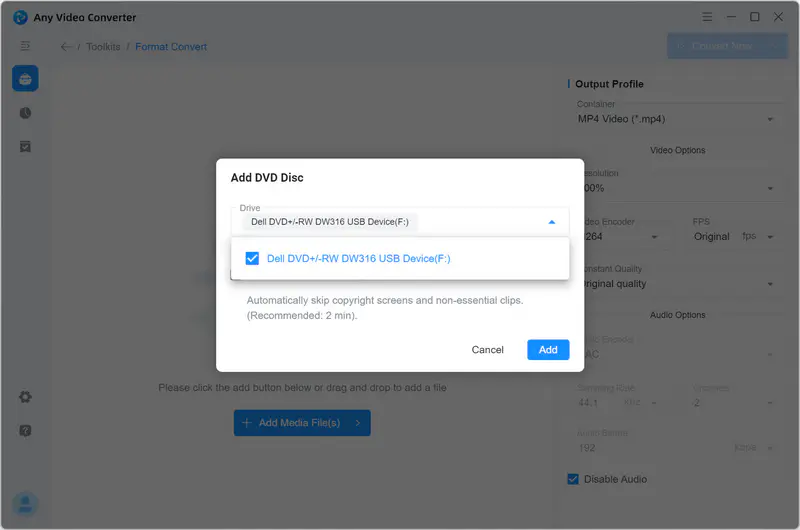
Step 1: Add a DVD Disc to Any Video Converter
Once the DVD drive is connected and recognized by your computer, launch Any Video Converter and choose the 'Format Convert' tool.
Click 'Add DVD Disc', select the DVD drive from the prompt, and click 'Add' to start scanning the DVD.
Tips: You can enable 'Automatically skip copyright screens and non-essential clips (Recommended 2-min)' threshold, so short titles such as menus, intros, trailers, or bonus clips can be filtered out during scanning.
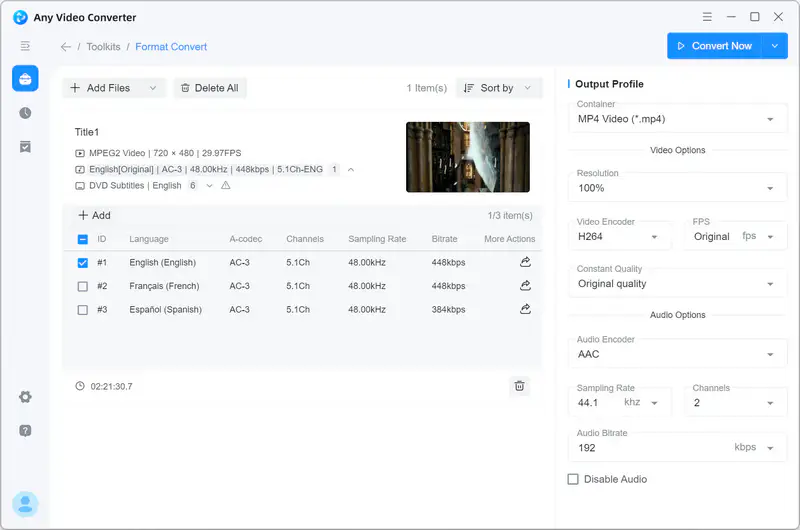
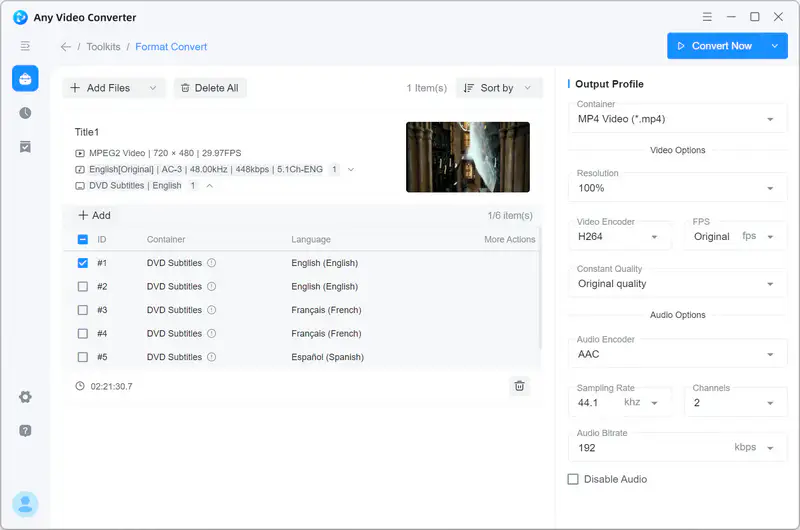
Step 2: Select Subtitles and Audio Tracks
After scanning, all available titles, or only the filtered ones, will be listed. For each title, you can select subtitles and audio tracks you want to keep.
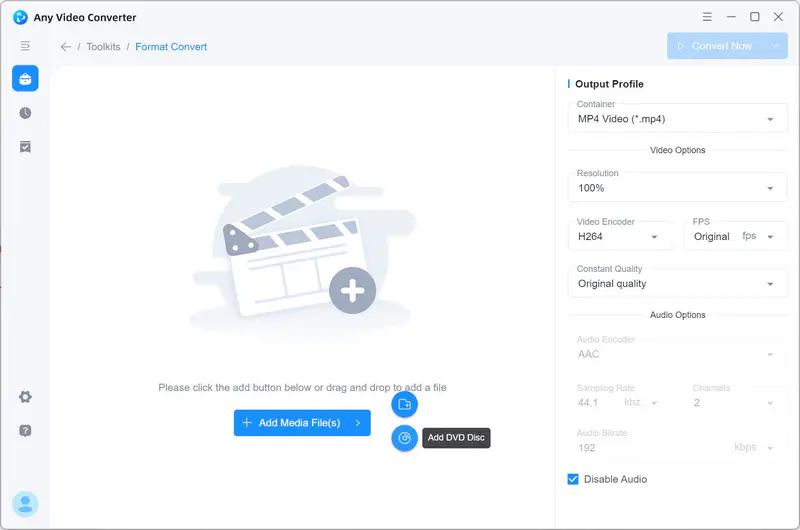
Step 3: Select MP4 as the Output Format
Under 'Output Profile', select 'MP4 Video (*mp4)' as the output format. You can also customize output settings such as video codec, resolution, quality, FPS, audio quality, sample rate, and more.
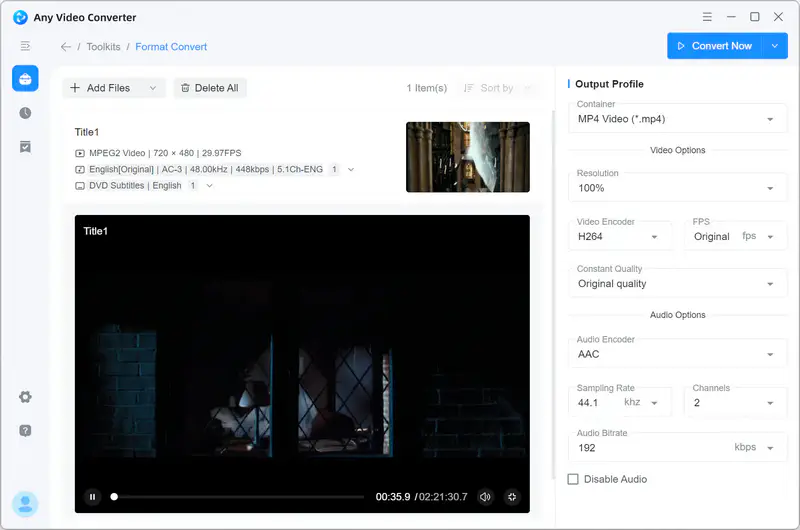
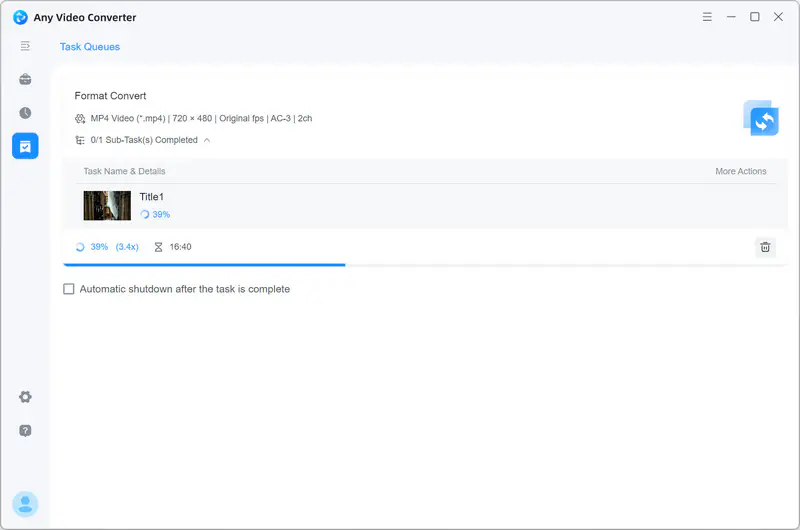
Step 4: Start Ripping DVD to MP4
Once all settings are completed, click 'Convert Now' to start converting the DVD to MP4 with Any Video Converter.
6.2 MakeMKV — Best for Lossless MKV Backup
MakeMKV is a dedicated disc to MKV tool that can extract DVD and Blu-ray content to MKV without re-encoding, preserving the original video, audio tracks, subtitles, metadata, and chapters. It is often used as a companion tool for HandBrake: first create a large MKV copy with MakeMKV, then import the MKV into HandBrake to compress it or convert it to MP4.
Availability: Windows XP or later; Mac OS X 10.7 or later; Linux x86 or amd64.
| Pros: | Cons: |
|
🔴 Can extract many DVDs and Blu-ray discs, including many encrypted discs, to MKV. 🔴 Preserves original video, audio tracks including HD audio, subtitles, metadata, and chapters without re-encoding. 🔴 Creates lossless MKV copies without changing the original video or audio quality. |
⚫ Only outputs MKV files, so you need HandBrake or Any Video Converter to compress the file or convert it to MP4, MOV, or other formats. ⚫ DVD functionality is free, while Blu-ray processing is shareware and may require a license after the trial period. |
How to Rip DVDs to MKV for Free with MakeMKV
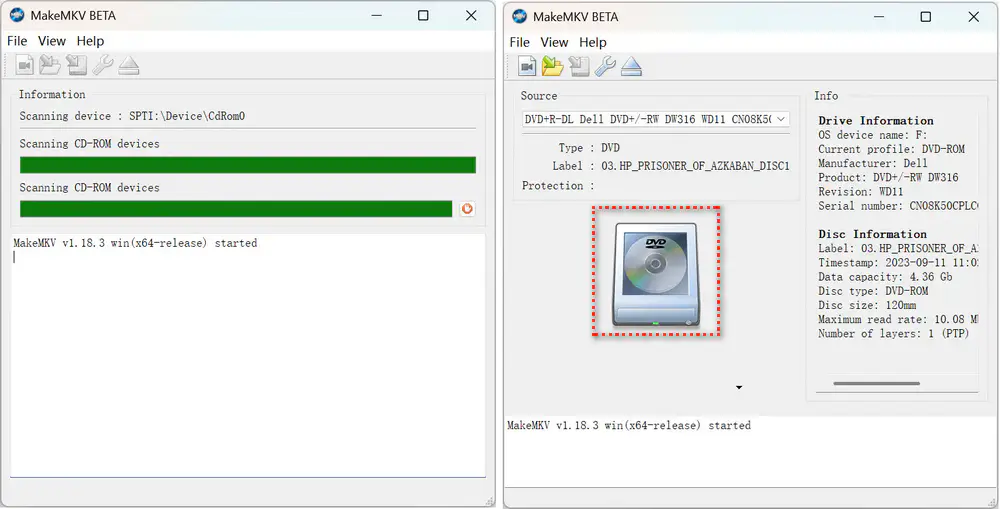
Step 1: Open the Disc
Launch MakeMKV. It will detect your optical drive and show it under Source. Click the large disc/drive icon in the middle of the window to open the disc and start scanning its titles.
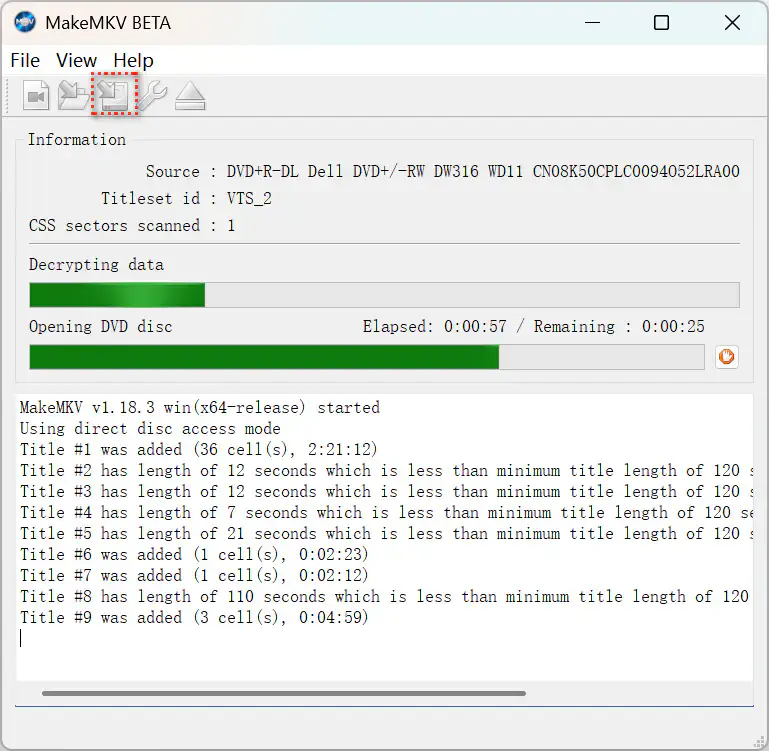
Step 2: Select the Titles, Audio Tracks, and Subtitles
After scanning the disc, MakeMKV lists the available titles. Select the titles you want to save. You can also expand each title to choose the audio tracks and subtitles you want to keep.
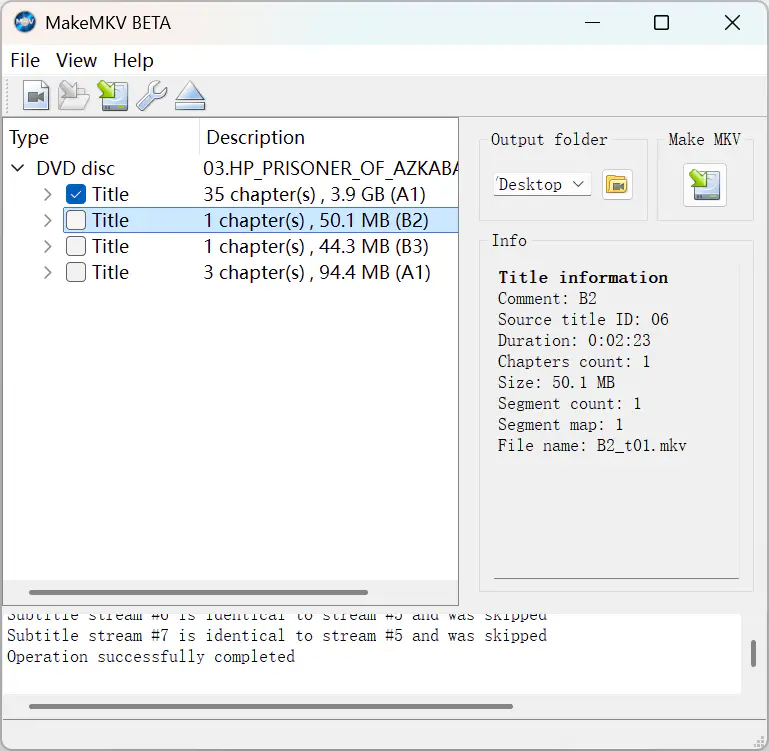
Step 3: Save Selected Titles as MKV
Choose an output folder, then click 'Save selected titles' to export the selected titles as MKV files.
Part 7: FAQs About Ripping DVDs with HandBrake
Q1: Is HandBrake free and safe?
Yes. HandBrake is free, open-source software licensed under GPLv2, and anyone can download and use it for free. It is also safe to use as long as you download it from the official HandBrake website, GitHub, or Flathub. Avoid third-party download sites or unofficial mirrors, as they may bundle unwanted software or unsafe installers.
Q2: Can HandBrake rip protected DVDs?
No, HandBrake does not include built-in copy-protection removal or DRM bypassing. You can use libdvdcss to read certain CSS-protected DVDs, but it is not a universal solution and may not be legal in all regions.
Q3: Can HandBrake keep subtitles?
Yes. HandBrake can keep one or multiple subtitle tracks when ripping DVDs. After scanning the DVD titles, open the Subtitles tab and select the subtitle track or tracks you want to keep.
If you want to preserve multiple subtitle tracks, MKV is recommended as the output container. MP4 has more limited subtitle support, especially for DVD bitmap subtitles, while MKV is more flexible for multiple subtitle tracks.
Q4: How long does HandBrake take to rip a DVD?
It depends on the DVD title length, DVD drive speed, disc condition, output preset, video encoder, quality settings, filters, and your computer hardware. In our test, we converted a DVD title with a runtime of 2 hours and 21 minutes on a Windows 11 laptop equipped with an Intel® Core™ i9-13900HX processor and an NVIDIA GeForce RTX 4060 Laptop GPU. With the HQ 480p30 Surround (H.264) preset selected, the conversion took about 25 minutes to complete. Your result may be faster or slower depending on your source DVD and settings.
Conclusion: Is HandBrake Still One of the Best Tools to Rip DVDs?
Yes. HandBrake is still one of the best free tools for ripping homemade, personal, or unprotected DVDs, especially for users who want more control over presets, codecs, filters, subtitles, audio tracks, and other advanced settings. However, it does not include built-in copy-protection removal and can feel complicated for beginners.
If you want a simpler way to convert DVDs to MP4, MKV, MOV, AVI, and other popular formats without adjusting too many technical settings, Any Video Converter is an easier free alternative. Download Any Video Converter and try its free DVD ripping tool to turn your DVDs into digital videos in just a few clicks.


Charlie Campbell | Content Writer
Charlie Campbell is an experienced technical documentation writer with a background in software development and a passion for emerging AI technologies. Dedicated to helping readers stay ahead in the fast-paced digital landscape, he combines technical expertise with clear communication to simplify complex topics and keep audiences informed on the latest advancements.