


How to Blur a Video: Comparison of Filmora and AVCLabs Video Blur AI
Blurring a video is a process of making certain parts of the video less visible or less clear. This can be done to obscure an object in the video for privacy, to avoid potential copyright infringement, and to protect the identity of people who appear in the video to obscure sensitive information or create an abstract look. There are several ways to blur a video, and the best way will depend on your goal. You can blur an entire video, or you can blur only specific parts of the video. You can also blur an entire video, then focus on specific parts for additional effects.
Most video editing software programs will allow you to blur a video. Besides that, there are also some professional AI-based tools for blurring videos. This post will compare two popular software programs, the video editor Filmora and the AI-based software AVCLabs Video Blur AI, in terms of features, price, and ease of use as well as provide step-by-step instructions on how to blur a video.
- • Part 1: Introduction to AVCLabs Video Blur AI and Filmora: What are their Main Features
- • Part 2: How to Blur a Video
- 2.1 Detailed Steps to Blur a Video with AVCLabs Video Blur AI
- 2.2 Detailed Steps to Blur a Video with Filmora
- • Part 3: Prices of Filmora and AVCLabs Video Blur AI
- • Part 4: Pros and Cons of Using AVCLabs Video Blur AI and Filmora to Blur a Video
 Part 1: Introduction to AVCLabs Video Blur AI and Filmora: What are their Main Features
When it comes to blurring a video, two popular software programs stand out: Filmora and AVCLabs Video Blur AI. Both of these programs offer powerful tools for blurring video, and each has its unique features. In this section, let’s take a look at both programs and compare their features.
1.1 Introduction to AVCLabs Video Blur AI and Its Main Features
AVCLabs Video Blur AI, as its name suggests, is a professional video blur app that uses artificial intelligence (AI), machine learning algorithms, and motion tracking to detect moving people, faces, and objects that might be distracting or unnecessary, and then automatically blurs them out.
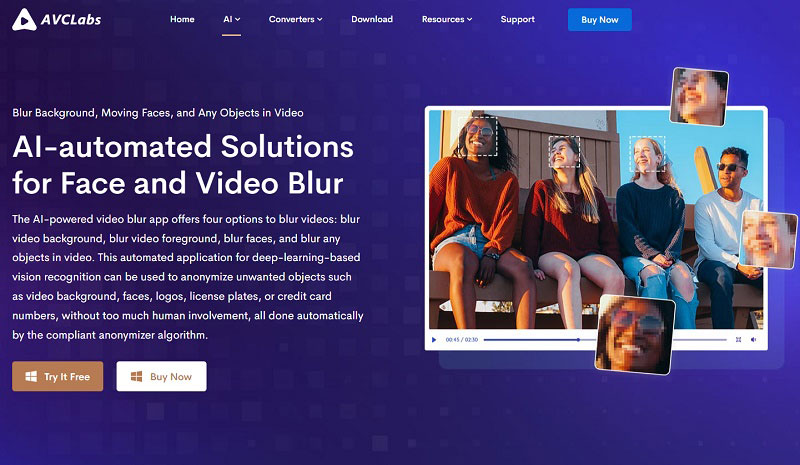
Specifically, its main function, or the objects that can be blurred, can be divided into three major categories. First is to blur faces in videos, which can not only blur single or multiple still faces, but also automatically detect and blur selected single or multiple moving faces. The second category is custom blurring. It can be used to blur any part or objects in the video such as logos, license plate numbers, etc. The third category is background blurring as well as foreground blurring, which blur the entire background to highlight only specific people.
AVCLabs Video Blur AI
- Automatically detect, recognize, and track faces in videos for anonymization with precision.
- Blur the detected faces selectively for single face or multiple faces in a video.
- Blur unwanted or sensitive objects of a video.
- AI-automated solutions for face blurring and video object blurring.

1.2 Introduction to Filmora and Its Main Features
Filmora is a video editing software created by Wondershare. Unlike Adobe Premiere Pro, Filmora is much easier to use, and the learning curve is not as steep. Its main function is to do all kinds of editing of videos, for example, trimming or cropping videos, adding clips, applying effects and transitions, adjusting colors, setting the speed of your videos, adding text or captions, creating title sequences, and much more.
Filmora is characterized by providing a wealth of preset effects to simplify the video editing process. Blurring videos is also realized by adding special effects.
 Part 2: How to Blur a Video
This article will use these two programs to blur different parts of the same video separately to compare their ease of use and effectiveness.
Video Tutorial: How to Blur a Video
2.1 Detailed Steps to Blur a Video with AVCLabs Video Blur AI
Add the Video to AVCLabs Video Blur AI
After installing the AVCLabs Video Blur AI, launch it and click the Browse button to import the video file, or drag and drop the source video to the program directly.

Add Blur Tasks
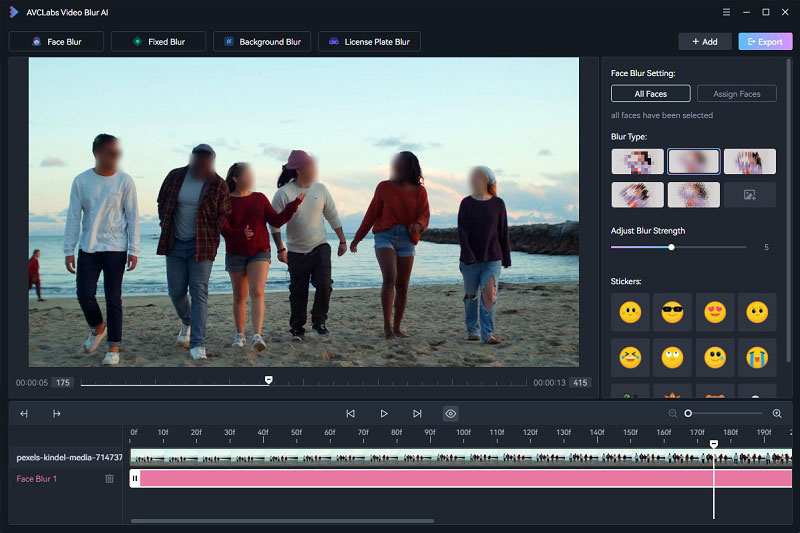
There are three types of blur, namely, Face Blur, Fixed Point Blur, and BG Blur for different purposes.
1. Blur Multiple Moving or Still Faces
The All Faces feature permits you to obscure all faces detected quickly. All you have to do is select a Blur Type, designate the Start Frame and End Frame, and then hit Add Face Blur Task.
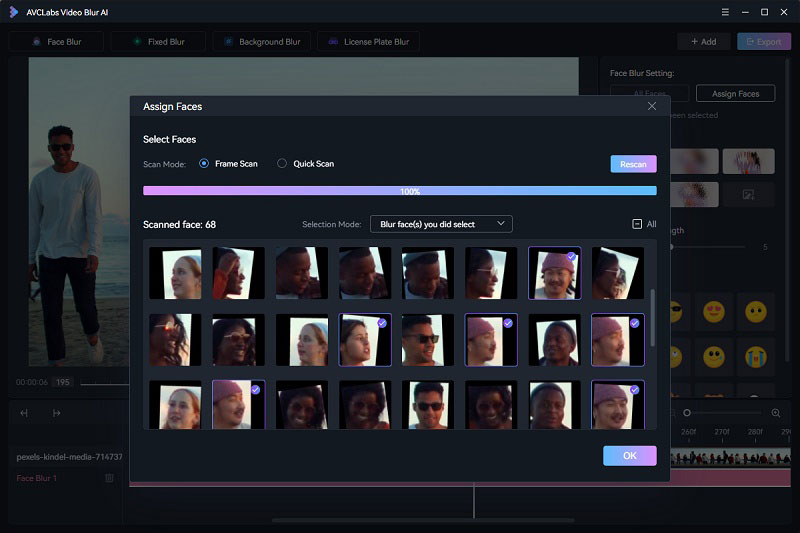
The Assign Face feature is used to blur specified faces. First, you need to scan the video. There are two types of scan modes. The Full Scan will scan each frame with high accuracy, but is more time-consuming. The Quick Scan will scan according to the interval frame number you set, which is faster but less accurate. Check the faces shown in the panel and choose to blur face(s) you did select or blur face(s) you did not select. Then choose a blur type. Finally, click Add Face Blur Task.
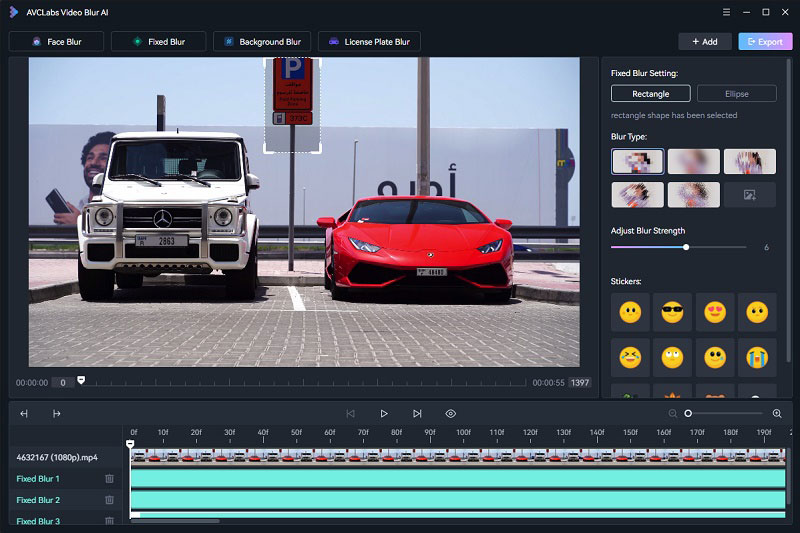
2. Blur Targeted Objects in the Video
Select Fixed Point Blur. Left-click to drag the position and size of the rectangle or circle to cover the part to be blurred. Set the start and end frame, then Add Fixed Point Blur Task.
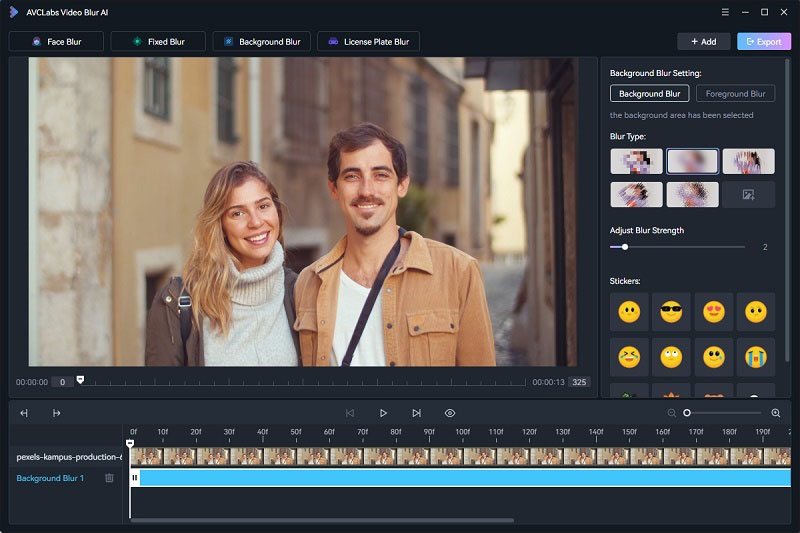
3. Blur Background or Foreground
Select the BG Blur. Decide whether you want to blur the background or the foreground, set the start and end frame, then Add BG Blur Task.
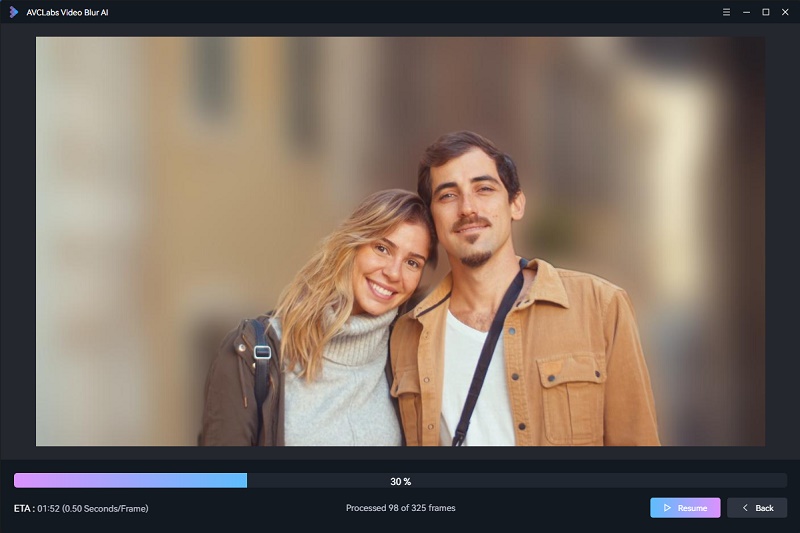
Export the Video
Before starting processing, you can also right-click the task bar in the timeline to delete, edit or crop it. After all the parameters are set well, click the Eye button to preview the effect, and finally click the Export Video button to start blurring faces and objects.
2.2 Detailed Steps to Blur a Video with Filmora
Blurring a video with Filmora requires selecting different effects depending on the blurred object. Here are some of the effects currently available for blurring different objects in a video.
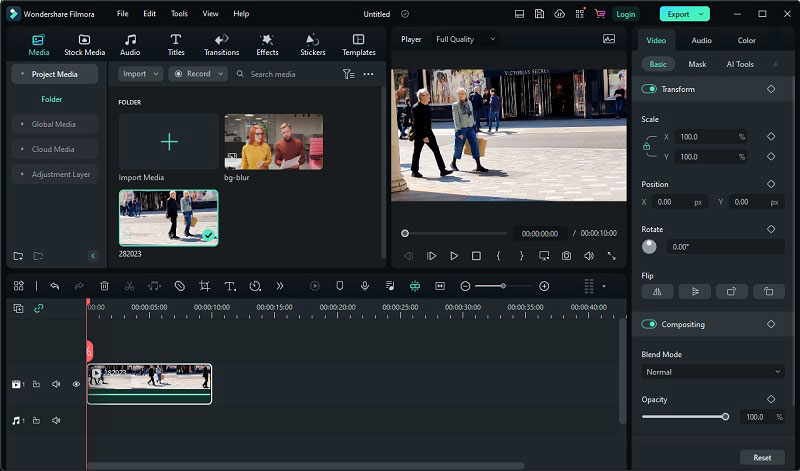
Add the Video to Filmora
Click Media and select Import Media. Then drag the video to a timeline.
Add Different Blur Effects for Different Purposes
1. Blur Faces in the video
Click the Effects tab and select Video Effects-Basic. Drag Face-off to a new timeline and adjust the duration.

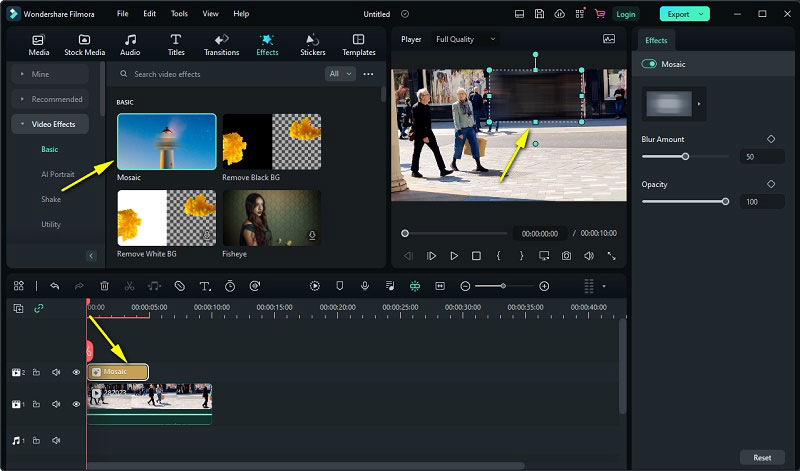
2. Blur Targeted Objects
Find the Mosaic effect in the basic video effects, also drop it to the timeline and then adjust the type of blur, the position, and the size of the blur box as well as the duration. Please note that the position of the selected mosaic here is fixed and will not move as the video changes.
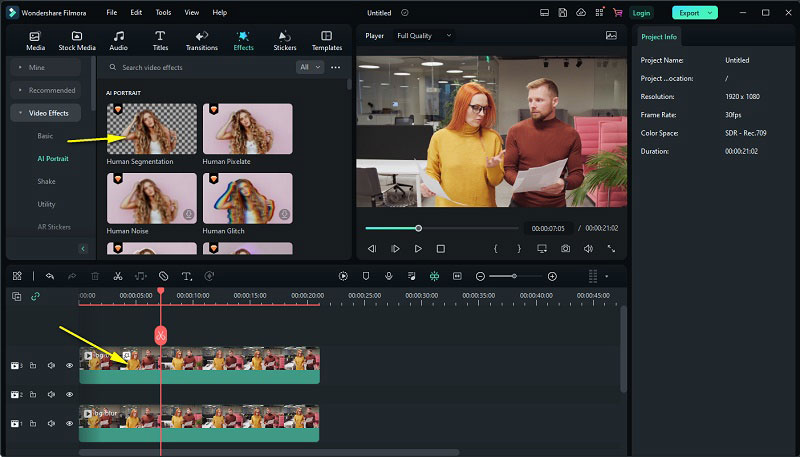
3. Blur Video Background
After adding one video to the timeline, drag and drop the same video twice to another new timeline, making them like a sandwich. Click the Effects tab and select AI Portrait, drag and drop the Human Segmentation effect to the upper footage. Then move the top video on the track above to make space for the blur effect in between.
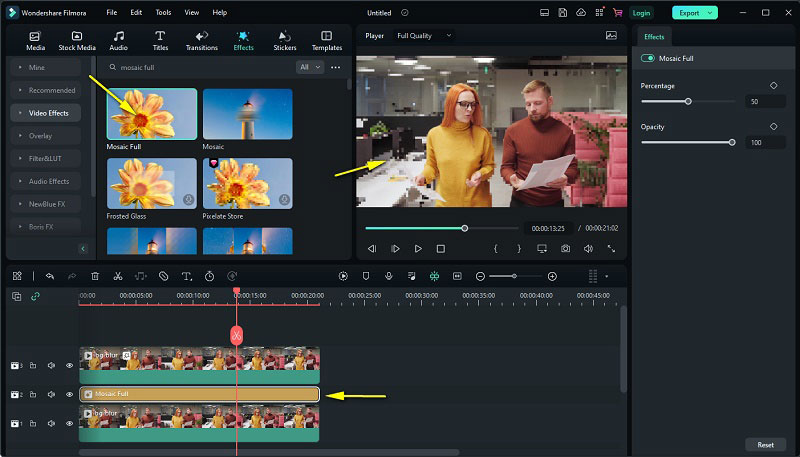
Find the Mosaic Full effect, if you can’t locate where the effect is, just type the name of the effect into the searching box to search it directly. Finally, drop the effect to the middle track and adjust the duration according to the length of the footage.
Export the Video
Click the play button to preview the final video. Then hit the Export button in the upper right corner to save the blurred video.
Part 3: Prices of Filmora and AVCLabs Video Blur AI
Both AVCLabs Video Blur AI and Filmora offer free trial services, but the processed videos exported by the free version are all watermarked. Moreover, there are many special effects in Filmora that can only be used after a subscription fee. Users can preview the effects of these paid special effects for free, but the exported video does not have these effects. Now let’s take a look at their subscription plans. (The price of the Windows version is used here as a comparison. )
Filmora offers three different subscription plans: Annual Plan costs $49.99 per year, Cross-Platform Plan, which is available to Windows PC, Mac, Android Phone, iPhone, iPad, and Android Tablet, costs $59.99 a year, and the last Perpetual Plan requires $79.99 a year.

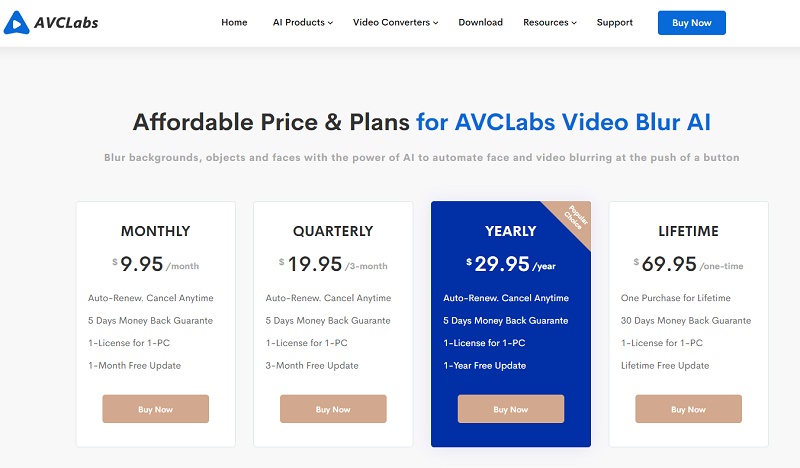
AVCLabs Video Blur AI is currently only available for the Windows version. It offers five subscription plans. They are $9.95 for one month, $19.95 for three months, $29.95 for one year, and $69.95 for a perpetual plan.
Part 4: Pros and Cons of Using AVCLabs Video Blur AI and Filmora to Blur a Video
4.1 The Pros and Cons of AVCLabs Video Blur AI
Pros:
1. Professional video blur app that enables users to blur multiple moving faces or specified faces automatically.
2. The steps to blur the background are much easier than Filmora, and it also supports removing the foreground.
3. Easy to use: it has an intuitive user interface that makes it easy for users to quickly and effectively blur out backgrounds and objects in videos.
4. Affordable pricing: it provides a cost-effective solution for blurring objects and backgrounds in videos. There are several different packages available, making it easy for users to choose the one that best fits their needs.
Cons:
1. Limited device: Only available to Windows users.
4.2 The Pros and Cons of Filmora
Pros:
1. Edit and blur video in one software: Filmora is a more comprehensive video editing software with more features. Users don’t have to edit videos and then use another application to blur videos.
2. Multiple devices available: Available for Windows PC, Mac, Android Phone, iPhone, iPad, and Android Tablet.
Cons:
1. Unable to blur multiple moving faces: As shown in the tutorial, when using the face-off effect to blur a moving face, it only recognizes one face. So if you want to blur multiple moving faces, or specify faces to be blurred among multiple faces, you have to blur them manually frame by frame, and that is time-consuming.
2. Complicated operation steps for removing the video background.
3. Annual subscription only, which can be quite costly for those on a budge
Filmora and AVCLabs Video Blur AI both offer powerful tools for blurring video. Both programs offer a variety of blur effects, the ability to blur an entire video or just parts of the video. However, there are some key differences between the two programs as stated above. In general, Filmora is a more comprehensive video editing software program that offers more features, while AVCLabs Video Blur AI is more focused on blurring video that offers more advanced features for creating unique blur effects.
Conclusion:
Blurring video is an essential skill for creating professional and aesthetically pleasing videos. There are a variety of programs available for blurring video, and two of the most popular are Filmora and AVCLabs Video Blur AI. This article has compared the features of both programs and provided step-by-step instructions on how to blur a video with each program. As well as the pros and cons of using Filmora and AVCLabs Video Blur AI. In terms of ease of use and functionality, AVCLabs Video Blur AI is definitely the best choice, as it simplifies the steps for the user and produces a very natural blurring effect. Ultimately, the best program for you will depend on your needs and preferences.
Try AVCLabs Video Blur AI to protect privacy!
Related Articles & Tips
- • Video Watermark Maker | How to Add A Watermark to A Video with A Logo or PNG Image
- • How to Effortlessly Blur Video Backgrounds on Computer, iPhone, Android, and Online for Free
- • Top 7 Best Video Blur Apps to Blur Faces or Any Part of A Video on iPhone, Android, Computer
- • How to Blur Part of A Video with AVCLabs Video Blur AI
- • How to Fix Instagram Story Video Blurry Problem
- • Easily AI Upscale Videos from 1080p to 4K
- • How to Restore Old Videos Automatically and Intelligently Like A Pro
- • Restore Old Home Movies to HD
- • How to Fix Bad Quality Videos
- • How to Remove Noise from Your Footage
- • How to Upscale Videos from HD to 4K
 AI Products


Hero Products


Video Converter
- MP4 Converters
- MKV to MP4 Converters
- AVI To MP4 Converters
- MOV to MP4 Converter
- Best Free AV1 Converters
- HEVC/H.265 Converter
- H.264 Video Converter
- Android Video Converter
- Samsung Video Converter
- Sony PS4 Video Converter
- Nokia Video Converter
- MPEG Video Converter
- Convert 4K to 1080P
- Convert MP4 to MP3
- Convert M2TS to MP4
- Convert MVI to MP4
- Convert WebM to MP4
- Convert Videos to MP3
- Convert MP4 to 3GP
- Convert M4V to MP4
DVD Converter
Video Editor
- Best AI Video Editors
- Free AI Video Generators
- Best AI Slideshow Makers
- Replace Face in Video
- AI Cartoon Video Generators
- Text-to-Video AI Generators
- Best Free Voice Changers
- Text-to-Video AI Generators
- Sites to Download Subtitles
- Add Subtitles to Video
- Free Online Video Compressor
- Convert Your Videos to GIFs
- Blur Video Backgrounds
- Video Editing Apps for YouTube
Video Enhancer
- Best 10 Video Enhancer
- Improve Video Quality
- Fix Blurry Videos
- Remove Noise from Footage
- Upscale Video from HD to 4K
- Upscale Video from 480P to 1080P
- Best AI Video Upscaling Tools
- Make a Blurry Video Clear
- Best Old Video Restorer
- How to Sharpen Video
- Fix Bad Quality Videos
- Increase Video Resolution
- Convert Videos to 4K
- Upscale Anime Videos to 4K
Photo Enhancer
- Fix Blurry Pictures Online
- Make Blurrys Picture Clear
- Increase Image Resolution Online
- Remove Blur from Images
- AI Image Sharpener Online
- Topaz Gigapixel AI Alternatives
- Fix Low-resolution Photos
- Colorize Historical Photos
- Remove Noise from Photos
- AI Image Sharpener
- AI Face Retoucher
- AI Image Enlargers